
Affichage des articles dont le libellé est howto. Afficher tous les articles
Affichage des articles dont le libellé est howto. Afficher tous les articles

GPG: minimal how to
GPG minimal how-to !
GPG is a free and easy way to encrypt and/or verify your exchanges.This HowTo was done with "gpg (GnuPG) 1.4.22" a GNU GPLv3 tool.
This post includes GPG basic commands:
- generate your key
- send/receive encrypted content
- sign or verify a content
- export/import your secret key
on windows host, you could install and use git bash to follow this steps
- Initialize GPG tool using 'list keys' ?
$ gpg --list-keys
gpg: répertoire « /home/osboxes/.gnupg » créé
gpg: nouveau fichier de configuration « /home/osboxes/.gnupg/dirmngr.conf » créé
gpg: nouveau fichier de configuration « /home/osboxes/.gnupg/gpg.conf » créé
gpg: le trousseau local « /home/osboxes/.gnupg/pubring.kbx » a été créé
gpg: /home/osboxes/.gnupg/trustdb.gpg : base de confiance créée
First time a gpg command is executed, gpg produces base gpg init: a ~/.gnupg directory
- How to generate my key ?
$ gpg --gen-key
Keep default options, and answer question about real name, and email, and passphrase.
That's all.
Now you can list your key:
$ gpg --list-secret-keys
You could distribute your public key:
$ gpg --keyserver hkp://keyserver.ubuntu.com:80 --send-keys KEYIDHERE
- How to send encrypted content ?
- Search (or ask) your recipient KEYID using the following command:
$ gpg --keyserver hkp://keyserver.ubuntu.com:80 --search-keys robert
- Receive the key (require KEYID)
$ gpg --keyserver hkp://keyserver.ubuntu.com:80 --recv-keys KEYIDHERE
- Encrypt file using a given recipient (require related key)
$ gpg -r jojo@yoyo.fr -o encrypted.gpg -e clear_content.txt
this command will encrypt "clear_content.txt" into "encrypted.gpg" using "jojo@yoyo.fr" key.
you could add multiple recipient by repeating -r option
you coul ascii encode by using -a option
you could add multiple recipient by repeating -r option
you coul ascii encode by using -a option
- Use your favorite email client to send encrypted file.
- How to receive encrypted content from somebody
- You will need the following requirements:
- generate and distribute your own key (step above)
- communicate about the way to encrypt content (step above) to you recepient
- Use your favorite email client to receive encrypted file.
- Decrypt received file using the following command:
$ gpg -o decrypted.txt -d encrypted.gpg
- How to add detached signature?
You would like to prove that YOU send clear information (this command doesn't encrypt the message itself)
$ gpg -o doc.sig --clearsign doc
You will need to answer you passphrase.
This will add a clear signature from doc and generate doc.sig as result
This will add a clear signature from doc and generate doc.sig as result
- How to verify message with detached signature?
You would like to prove clear information associated signature identity (this command doesn't decrypt the message itself)
Assume you message with detached signature is in a file called "doc.sig"
$ gpg -o doc -d doc.sig
- How to backup your secret key?
$ gpg --list-secret-keys
$ gpg --export-secret-keys -a MYKEYID > username_gpg_export_secret.asc
$ gpg --import -a username_gpg_export_secret.asc
Related documentations
HowTo: Swig C to Java: functions that manage an array of int, simple or complex struct (eg. array of objects)
You would like to map a C code from your Java application and you have heard about Swig: this post is for you!
This post is a really simple example to understand how to manage (from Java application) a C array of complex structure.
After reading Swig 3 documentation and searching on the net, I've finally succeed to create a little poc on how to return a list of struct.
proof of concept sample includes 4 functions:
source of this poc is available here : https://github.com/boly38/pocswig
this poc is widely inspirated from similar example from "Samuel Jacob's Weblog" post (thanks to him !)
First file to write is the C header
The you will then have to write the C implementation. Here is a sample
And now to access this function from java, you will have to use Swig.
Swig use a specification file to setup how to map function/types/etc... This file is a
Line 1 define the module name,
Line 3&4 define how to handle int array using swig facility,
Line 6 to 8 to tell to Swig to output include line into the target wrapper file.
Line 10 reuse as is the header file as specification (Swig MUST wrap all header file methods and structs to Java).
Line 11 to 15 to tell to Swig to append an extra function to help Java user to access to array element.
Now you will have to generate Java files! Use Swig :
Now you can play with your new library from Java; exemple
I let you execute that:
If you see something wrong, please tell me. Else hopes this helps!
This post is a really simple example to understand how to manage (from Java application) a C array of complex structure.
After reading Swig 3 documentation and searching on the net, I've finally succeed to create a little poc on how to return a list of struct.
proof of concept sample includes 4 functions:
- a function
sumitemsthat accept an array of integer as parameter to calculate a sum (part of Swig3 documentation) - a function
populateSampleItemthat just write on a given simple structure - a function
populateItemsthat update an existing array of struct - a function
buildItemsthat create from scratch a result array of struct
source of this poc is available here : https://github.com/boly38/pocswig
this poc is widely inspirated from similar example from "Samuel Jacob's Weblog" post (thanks to him !)
First file to write is the C header
poc.h:
1 2 3 4 5 6 7 8 9 10 11 12 13 14 15 16 17 18 19 20 21 22 23 | /* (in) simple int array as parameter */ int sumitems(int *first, int nitems); /* simple structure */ typedef struct MyItem_t { int id; char *name; } MyItem; /* (in/out) simple struct as parameter (updated by the function) */ void populateSampleItem(MyItem *item); /* array of structure */ typedef struct MyItems_t { int count; // elements count MyItem *elements; // array of MyItem } MyItems; /* (in/out) array of structure as parameter (updated by the function) */ void populateItems(MyItems *items); /* (out) array of structure (generated by the function) */ MyItems *buildItems(); |
poc.c:
1 2 3 4 5 6 7 8 9 10 11 12 13 14 15 16 17 18 19 20 21 22 23 24 25 26 27 28 29 30 31 32 33 34 35 36 37 38 39 40 41 42 43 | #include <stdlib.h> #include <stdio.h> #include <string.h> #include "poc.h" int sumitems(int *first, int nitems) { int i, sum = 0; for (i = 0; i < nitems; i++) { sum += first[i]; } return sum; } void populateSampleItem(MyItem *item) { item->id = 1234; item->name = strdup("getSampleItem"); } void populateItems(MyItems *items) { int nb = items->count; items->elements = malloc(nb * sizeof(MyItem)); for (int j=nb-1;j>=0;j--) { items->elements[j].id = j; char elementName[80]; sprintf(elementName, "populateItems %d", j); items->elements[j].name = strdup(elementName); } } MyItems *buildItems() { printf("buildItems 14 elements"); int nb = 14; MyItems *items= malloc(sizeof(MyItems));; items->count = nb; items->elements = malloc(nb * sizeof(MyItem)); for (int j=nb-1;j>=0;j--) { items->elements[j].id = j; char elementName[80]; sprintf(elementName, "buildItems %d", j); items->elements[j].name = strdup(elementName); } return items; } |
And now to access this function from java, you will have to use Swig.
Swig use a specification file to setup how to map function/types/etc... This file is a
.i file. Here is the file poc.i:
1 2 3 4 5 6 7 8 9 10 11 12 13 14 15 | %module swigpoc %include "arrays_java.i"; %apply int[] {int *}; %{ #include "poc.h" %} %include "poc.h"; %extend MyItems_t{ MyItem * getElement(int i) { return &$self->elements[i]; } } |
Line 3&4 define how to handle int array using swig facility,
Line 6 to 8 to tell to Swig to output include line into the target wrapper file.
Line 10 reuse as is the header file as specification (Swig MUST wrap all header file methods and structs to Java).
Line 11 to 15 to tell to Swig to append an extra function to help Java user to access to array element.
Now you will have to generate Java files! Use Swig :
rm -f *Item.java *.o *.dll swigpoc*
swig -java poc.i
You could look at your directory, there is some new C and Java files:
poc_wrap.c, MyItem.java, MyItems.java, swigpoc.java swigpocJNI.java
Next step is to build up the DLL (shared library) (exemple under Cygwin):
1 2 3 4 5 6 | #!/bin/bash JAVA_HOME=/cygdrive/c//Programmes/Java/jdk1.8.0_112/ INCLUDES="-I$JAVA_HOME/include/ -I$JAVA_HOME/include/win32/" x86_64-w64-mingw32-gcc.exe -c poc.c poc_wrap.c $INCLUDES x86_64-w64-mingw32-gcc.exe $INCLUDES -shared -o poc.dll poc_wrap.o poc.o |
PocExample.java:
1 2 3 4 5 6 7 8 9 10 11 12 13 14 15 16 17 18 19 20 21 22 23 24 25 26 27 28 29 30 31 32 33 34 35 36 37 38 39 40 41 42 | public class PocExample { static { System.out.println("load poc ..."); System.loadLibrary("poc"); System.out.println("load poc ... OK "); } public static void main(String args[]) { System.out.println("poc"); System.out.println("sumitems:"); int[] arrayB = new int[10000000]; // Array of 10-million integers for (int i=0; i<arrayB.length; i++) { // Set some values arrayB[i] = i; } int sum = swigpoc.sumitems(arrayB, 10000); System.out.println("SumB = " + sum); System.out.println("MyItem:"); MyItem myt = new MyItem(); swigpoc.populateSampleItem(myt); System.out.println("myt.name = " + myt.getName()); MyItems myts = new MyItems(); myts.setCount(10); swigpoc.populateItems(myts); for (int j=0; j<myts.getCount(); j++) { System.out.println(String.format("myts.element[%d].name = '%s'",j, myts.getElement(j).getName())); System.out.println(String.format("myts.element[%d].id = '%s'" ,j, myts.getElement(j).getId())); } MyItems rez = swigpoc.buildItems(); for (int k=0; k<rez.getCount(); k++) { System.out.println(String.format("rez.element[%d].name = '%s'",k, rez.getElement(k).getName())); System.out.println(String.format("rez.element[%d].id = '%s'" ,k, rez.getElement(k).getId())); } } } |
I let you execute that:
1 2 3 | #!/bin/bash JAVA_HOME=/cygdrive/c//Programmes/Java/jdk1.8.0_112/ $JAVA_HOME/bin/javac *.java && $JAVA_HOME/bin/java PocExample |
If you see something wrong, please tell me. Else hopes this helps!
How to Jenkins : chain jobs with parameters
This post describes How To chain jobs with parameter(s).
- Choose optionA if you're using pipeline plugin.
- OptionB is a little bit deprecated, but usefull if you would like to script your build execution or trigger it remotely.
NB: this option will make loosing your pipeline chain.
I recommend to use 2 small dedicated temp jobs to test it first. That would avoid to run unnecessarely long build...
Steps :
 Add a shell script to echo the variable.
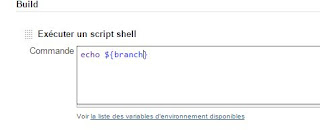

 Go to the Job console to check curl http status.
 Go to the follower (second) job logs.
 Check the follower result!

- Choose optionA if you're using pipeline plugin.
- OptionB is a little bit deprecated, but usefull if you would like to script your build execution or trigger it remotely.
(option A) Define a post action in first job
First recommended and simple way if your are using "Build Pipeline". Go to the first job configuration to append a post-action :
(option B) Chain it using shell scripts
NB: this option will make loosing your pipeline chain.
I recommend to use 2 small dedicated temp jobs to test it first. That would avoid to run unnecessarely long build...
Steps :
- Install Build Token Root Plugin
- Define first job with parameter
- Define second job ("follower") with parameter
- Define a trigger for the follower
- Append a shell script to chain the two jobs
- Try!
Install Build Token Root Plugin
Ask to your Jenkins administrator to install this plugin : Build Token Root Plugin
Wait that Jenkins reboot (required).
Define first job with parameter
Add "branch" parameter to your first job.


Define follower job with parameter
Add "branch" parameter to your second job (same as previously).
Add a shell script to echo the variable(same as previously).
Define a trigger for the follower
Add a trigger for the second job. Set a secret token here.

Append a shell script to chain the two jobs
Open the first job configuration to add the following shell script.
You will need to adapt the jenkins host value corresponding to your environment.
# show job parameter
echo branch=${branch}

#  resources
#  https://wiki.jenkins-ci.org/display/JENKINS/Parameterized+Build
#  https://wiki.jenkins-ci.org/display/JENKINS/Build+Token+Root+Plugin
#  http://curiositedevie.blogspot.nl/2016/02/how-to-jenkins-chain-jobs-with.html
export JENKINS_HOST=https://myjenkins.domain.net
export JOB_TOKEN=THISISWONDERFULL
export JOB_NAME=git_config_follower
export JOB_PARAM1=branch=${branch}
export JOB_CAUSE=Launching_follower_with_branch_set_to_${branch}
export JOB_PING="$JENKINS_HOST/buildByToken/buildWithParameters?job=$JOB_NAME&token=$JOB_TOKEN&$JOB_PARAM1&cause=$JOB_CAUSE"
echo $JOB_PING
curl --verbose --insecure $JOB_PING
Try!
Launch the first job with a parameter.


Microsoft Windows: minimal howto
This post is a kind of minimal 'how to' for Micro$oft Windows.
Windows : basic command (to execute from [WINDOWS + R])
cmd : classic console powershell : power shell command console msinfo32 : host info devmgmt.msc : devices management (fr: Gestionnaire de périphériques) certmgr.msc : certificates managers services.msc : windows OS services javaws -viewer : windows java services eventvwr.exe : Event viewerNB: for ssl cf ssl howtoshell:Startup : show startup programs (if any)procmon.exe : (download) show process actiity (really useful)compmgmt.msc : Computer Management
god mode (Windows 10)
- create a folder on windows 10 desktop and name it
GodMode.{ED7BA470-8E54-465E-825C-99712043E01C}
network related commands
- list all LISTENING ports
netstat -ano
netstat -ano | find "LIST"
- find an application from portsrc
netstat -ano | find "LIST"
==> Pick the wanted process id from the last column. Example pid "8112"
tasklist  | find "8112"
tasklist /svc | find "8112"
- DNS lookup
nslookup www.google.fr
nslookup
server 8.8.8.8
www.google.fr
other usefull common tools
- FileZilla (secure FTP)
- Notepad++ (light editor)
- Cygwin (unix like shell)
- Process Hacker 2 (improved task list manager)
ssl certificates and truststore: minimal howto
This post is a kind of minimal 'how to' for SSL, certificates and truststore :
For example, you could get the folloowing error :
to workaround this issue, you could follow these steps:
more documentation: tomcat8 ssl howto - sslshopper create self signed cert
- Tomcat HTTPS application : how to use a valid and trusted self-signed certificate for localhost
- SSL Client : "PKIX path building failed" error
Tomcat HTTPS application : how to use a valid and trusted self-signed certificate for localhost
Context
As WebDevelopper, I use Tomcat and I need to work with localhost with a secure web application. The issue with the latest browser update (ex. ggchrome) is that an invalid or untrusted self signed certificate could block the navigation or AJAX exchanges.For example, you could get the folloowing error :
NET::ERR_CERT_AUTHORITY_INVALID
:: certificate validation chain is not trusted
ERR_INSECURE_RESPONSE
:: unable to trust a server answer
to workaround this issue, you could follow these steps:
- generate a self-signed certificate for localhost
- tell to tomcat to use this certificate
- append this certificate to your workstation certificates manager
Generate a self signed certificate
$ keytool -genkey -keyalg RSA -alias tomcat \
  -keystore $HOME/.keystore -storepass changeit -validity 360 -keysize 2048
Warning: answer "localhost" to the first question
more documentation: tomcat8 ssl howto - sslshopper create self signed cert
Tomcat ssl configuration
Connector's attributes example fromserver.xml:
SSLEnabled="true" clientAuth="false"
keystoreFile="${user.home}/.keystore" keystorePass="changeit"
maxThreads="150" port="8443"
protocol="org.apache.coyote.http11.Http11NioProtocol"
scheme="https" secure="true" sslProtocol="TLS"
Append this certificate to your workstation certificates manager
- navigate to your tomcat application ; example :
https://localhost:8443 - (example using google chrome), right click on address bar lock / click on "certificate informations (...)" link / "details" tab
- Choose "copy certificate into file" - keep default format X509 DER.
- right click on the just created file to "Install certificate"
- Select the following target : "Trusted root certification authorities"("Autorités de certification racines de confiance")
- You could verify the certificate installation : Windows Start / Execute /
certmgr.msc; this will open Windows certificates manager - Restart your browser (use CTRL + ALT + Q for Google Chrome instead of closing the window).
- navigate to your tomcat application ; example :
https://localhost:8443: your certificate should be trusted now
SSL Client : "PKIX path building failed" error
Java error
javax.net.ssl.SSLHandshakeException:
sun.security.validator.ValidatorException: PKIX path building failed:
sun.security.provider.certpath.SunCertPathBuilderException: unable to find valid certification path to requested target
Java workarounds
- (bad and quick way) Disable all ssl check by configuration
cf. UnsafeSSLHelper (from javabox github project)
- (right way) Update the ssl verification chain. For example by importing new valid certificate(s) to your truststore.
Windows
- Windows / List certificates:
Start / Execute /certmgr.msc
- Google Chrome / List certificates:
go to Parameters, the search "ssl" (chrome://settings/search#ssl)
- Import a certificate in a truststore file:
Make a backup :
cp %JAVA_HOME%/jre/lib/security/cacerts %JAVA_HOME%/jre/lib/security/cacerts.orig
Import a certificate :
keytool -import -alias MyCert -keystore %JAVA_HOME%/jre/lib/security/cacerts \
     -trustcacerts -file MyCert.cer
(cf. commandes+keytool ...)
- Implort a certificate in JDK truststore:
create a little batch like this one :set JAVA_HOME=C:\Program Files\Java\jdk1.8.0_65 set PATH=%JAVA_HOME%\bin;%PATH% REM set JRE_CACERTS=%JAVA_HOME%\lib\security\cacerts set JDK_CACERTS=%JAVA_HOME%\jre\lib\security\cacerts set PASSWORD=changeit set DIR=certsdir for %%f in (%DIR%\*.cer) do keytool -keystore "%JRE_CACERTS%" -storepass %PASSWORD% -noprompt -importcert -alias "%%~nf" -file %%f for %%f in (%DIR%\*.cer) do keytool -keystore "%JDK_CACERTS%" -storepass %PASSWORD% -noprompt -importcert -alias "%%~nf" -file %%f
This script install all certificates under
certsdirto the JDK (or JRE).
shared libraries "lib.so and lib.dll" file: minimal how to
This post is a kind of minimal 'how to' for the shared libraries : ex. under linux
mylib.so or under windows my.dllWindows
- List library exported symbols (then functions):
- Tool : Dll Export Viewer (nirsoft.net)
- (visualstudio required)
dumpbin /exports my.dll[not tested]
Linux
- List library exported symbols (then functions)
readelf -s /usr/lib/libspreadsheet.so |grep workbook_sheet
nm -D /usr/lib/libspreadsheet.so |grep workbook_sheet
objdump -T /usr/lib/libspreadsheet.so |grep workbook_sheet
- List library dependencies
readelf -d /usr/lib/libspreadsheet.so|grep NEEDED
prosyst OSGi: minimal how to
This post is a kind of minimal 'how to' for Prosyst OSGi.
console (or telnet) commands
- (telnet only) toggle command to get stdout / stderr on the telnet output
dump
- Bundle installation
install mybundle.jar
- Bundle start
start mybundle.jar
- Bundle installation and start alias
i -S mybundle.jar
- Bundle restart alias
rs mybundle.jar
rs 42
- Bundle update := uninstall, install, start
update mybundle.jar
update 42
- whole prosyst OSGi framework restart (you will loose the telnet connection)
rs 0
- for more information : runtime_console 7.5 doc
How to resize a VirtualBox Ubuntu vm hard drive
HowTo : resize ubuntu vm hard drive hosted on Virtual Box

Pre-requisites
on host (host is the computer having virtualbox) :- VirtualBox version should be greater than 4.0.0
- you should have enough space to clone your VM and available space (using to extend your hard drive)
- you should have enought space to get gparted livecd (130Mo)
Step by step
original Ubuntu will be called "oU" and the clone "oUextended"- on oU menu halt ubuntu (or stop oU using VirtualBox)
- on virtualbox : right clic on oU, then (context menu) clone "oU"
- name the clone "oUextended" (or wathever you want)
- on host under a shell : go under oUextended directory and use this command to extend for example to 25GB the hard drive :
 c:\Users\myuser\VirtualBox VMs\UBUNTU_EXTENDED_25G>"c:\Program Files\Oracle\Virtual Box\VBoxManage.exe" modifyhd UBUNTU_EXTENDED_25G.vdi --resize 25625
 0%...10%...20%...30%...40%...50%...60%...70%...80%...90%...100%
- on virtualbox : oUextended/configuration you should show the hard drive size : 25G (==25625MB)
- on virtualbox : oUextended/configuration you should assert booting on CD before hard drive

- go to http://gparted.sourceforge.net/download.php and download the last stable gparted ISO
- on virtualbox : oUextended/configuration/storage : add a CD and select gparted iso
- on virtualbox : start oUextended
- on oUextended : boot menu : select the first and default choice : "GParted Live"
- on oUextended : anwer gparted question (depending of your preferences) : eg. keyboard azerty / fr / PC Keyboard / 08 French / (0)
- on oUextended : select the parent ("extended") of the partition you would like to extend : right clic on it / resize / extend to the full free size

- on oUextended : the parent ("extended") of the partition should have 24Gio size
- on oUextended : select the partition you would like to extend : right clic on it / resize / extend to the full free size

- on oUextended : the partition should have 24Gio size
- on oUextended : clic on "Apply" / wait the operations to finish / clic "Close"
- on oUextended : clic on "Exit" on the gparted desktop; then select "shutdown" / enter
- on virtualbox : oUextended/configuration/storage : remove gparted iso CD (should be an empty CD)
- on virtualbox : start oUextended
Assert the result on ubuntu xterm :
df -kh
Resources
- gparted : official website
- gparted : gparted french ubuntu documentation
- storage related question : virtualbox documentation
- a youtube video on how to resize VirtualBox hard drive
- codeformatter help me to format this article
Inscription à :
Articles (Atom)
Analyser les performances
Ouvre le gestionnaire des tâches:CTRL+MAJ+ECHAPDisque dur
Ajuster afin d’obtenir les meilleures performancesApplications imposées
Lister
Get-AppxPackage | Format-List -Property NameDésinstallation
Réinstaller une application
Si par erreur vous avez supprimé une application utile, reprenez son nom dans la ligne suivante (ex. pour la première^):Sources utilisées