

GPG: minimal how to
GPG minimal how-to !
GPG is a free and easy way to encrypt and/or verify your exchanges.This HowTo was done with "gpg (GnuPG) 1.4.22" a GNU GPLv3 tool.
This post includes GPG basic commands:
- generate your key
- send/receive encrypted content
- sign or verify a content
- export/import your secret key
on windows host, you could install and use git bash to follow this steps
- Initialize GPG tool using 'list keys' ?
$ gpg --list-keys
gpg: répertoire « /home/osboxes/.gnupg » créé
gpg: nouveau fichier de configuration « /home/osboxes/.gnupg/dirmngr.conf » créé
gpg: nouveau fichier de configuration « /home/osboxes/.gnupg/gpg.conf » créé
gpg: le trousseau local « /home/osboxes/.gnupg/pubring.kbx » a été créé
gpg: /home/osboxes/.gnupg/trustdb.gpg : base de confiance créée
First time a gpg command is executed, gpg produces base gpg init: a ~/.gnupg directory
- How to generate my key ?
$ gpg --gen-key
Keep default options, and answer question about real name, and email, and passphrase.
That's all.
Now you can list your key:
$ gpg --list-secret-keys
You could distribute your public key:
$ gpg --keyserver hkp://keyserver.ubuntu.com:80 --send-keys KEYIDHERE
- How to send encrypted content ?
- Search (or ask) your recipient KEYID using the following command:
$ gpg --keyserver hkp://keyserver.ubuntu.com:80 --search-keys robert
- Receive the key (require KEYID)
$ gpg --keyserver hkp://keyserver.ubuntu.com:80 --recv-keys KEYIDHERE
- Encrypt file using a given recipient (require related key)
$ gpg -r jojo@yoyo.fr -o encrypted.gpg -e clear_content.txt
this command will encrypt "clear_content.txt" into "encrypted.gpg" using "jojo@yoyo.fr" key.
you could add multiple recipient by repeating -r option
you coul ascii encode by using -a option
you could add multiple recipient by repeating -r option
you coul ascii encode by using -a option
- Use your favorite email client to send encrypted file.
- How to receive encrypted content from somebody
- You will need the following requirements:
- generate and distribute your own key (step above)
- communicate about the way to encrypt content (step above) to you recepient
- Use your favorite email client to receive encrypted file.
- Decrypt received file using the following command:
$ gpg -o decrypted.txt -d encrypted.gpg
- How to add detached signature?
You would like to prove that YOU send clear information (this command doesn't encrypt the message itself)
$ gpg -o doc.sig --clearsign doc
You will need to answer you passphrase.
This will add a clear signature from doc and generate doc.sig as result
This will add a clear signature from doc and generate doc.sig as result
- How to verify message with detached signature?
You would like to prove clear information associated signature identity (this command doesn't decrypt the message itself)
Assume you message with detached signature is in a file called "doc.sig"
$ gpg -o doc -d doc.sig
- How to backup your secret key?
$ gpg --list-secret-keys
$ gpg --export-secret-keys -a MYKEYID > username_gpg_export_secret.asc
$ gpg --import -a username_gpg_export_secret.asc
Related documentations
Galaxy Tab 10.1: HowTo move to CyanogenMod 10
1) Install TWRP (from this tutorial)
(suppose you already have adb installed)
BOOT with VOL UP + POWER
go to DOWNLOAD on right with VOL-UP
(wait odin)
on PC
Start ODIN
In AP field select TWRP => twrp311-20171009-p4wifi.tar.md5
clic "start"
(tablet reboot after install) unconnect USB and close odin
BOOT with VOL UP + POWER
go to UPDATE on left with VOL-LOW
connect tablet with USB
2) check ADB
ADB should dectect
\GalaxyTab10_1>c:\Adb\adb.exe devices
List of devices attached
C4F125509CFF91F recovery
2) boot onto TWRP and push ROM files
\GalaxyTab10_1>C:\adb\adb.exe push cm-10-20130825-UNOFFICIAL-p4wifi.zip /tmp
1300 KB/s (160472620 bytes in 120.502s)
\GalaxyTab10_1>C:\adb\adb.exe push gapps-jb-20121011-signed.zip /tmp
1295 KB/s (92706064 bytes in 69.888s)
Push SuperUser file
\GalaxyTab10_1>C:\adb\adb.exe push superuser.zip /tmp
1325 KB/s (3922325 bytes in 2.889s)
Install ROM
Install Gapps
Install SuperUser
REBOOT
(suppose you already have adb installed)
BOOT with VOL UP + POWER
go to DOWNLOAD on right with VOL-UP
(wait odin)
on PC
Start ODIN
In AP field select TWRP => twrp311-20171009-p4wifi.tar.md5
clic "start"
(tablet reboot after install) unconnect USB and close odin
BOOT with VOL UP + POWER
go to UPDATE on left with VOL-LOW
connect tablet with USB
2) check ADB
ADB should dectect
\GalaxyTab10_1>c:\Adb\adb.exe devices
List of devices attached
C4F125509CFF91F recovery
2) boot onto TWRP and push ROM files
\GalaxyTab10_1>C:\adb\adb.exe push cm-10-20130825-UNOFFICIAL-p4wifi.zip /tmp
1300 KB/s (160472620 bytes in 120.502s)
\GalaxyTab10_1>C:\adb\adb.exe push gapps-jb-20121011-signed.zip /tmp
1295 KB/s (92706064 bytes in 69.888s)
Push SuperUser file
\GalaxyTab10_1>C:\adb\adb.exe push superuser.zip /tmp
1325 KB/s (3922325 bytes in 2.889s)
Install ROM
Install Gapps
Install SuperUser
REBOOT
ROM Wiko Ridge Fab 4G - retour d'expérience
Wiko Ridge Fab 4 ROM: partage d'expérience
Après de nombreux problèmes avec la ROM officielle RIDGE FAB 4G_V14 (publicité sur le launcher ou clavier TouchPal, reboot intempestifs, blocages au démarrage, problèmes de détection de storage, desfois des problèmes avec la charge, et facebook..), et vu que nous ne sommes pas les seuls, nous décidons de changer de ROM.
Avec notre téléphone, nous n'avons pas trouvé de ROM non-officielle qui apporte satisfaction (notre exigence: DATA + GPS + CAMERA + STABLE): cf. Mini HowTo (B)
Avec la ROM officielle en supprimant TouchPal: cf. Mini HowTo (A).
Notre expérience: après 3 jours dans cette configuration, le téléphone est plutôt stable, il n'a fait que 2 reboot (non désirés) lors d'installations d'application. Après 20 jours, des problèmes de plantages d'applications google apparaissent. Très vite le téléphone ne boot plus.
Conclusion: changement de téléphone!
Wiko Ridge Fab 4 ROM: our feedback
Following multiples issues with official ROM (advertising from the laucher or TouchPal keyboard, unwanted reboots, startup hangs, storage detection issue, sometimes recharging issue or facebook issue..) and as we are not alone in this case, we decided to change ROM.
With our phone, we didn't found unofficial ROM which brig us satisfaction (DATA+GPS+CAMERA+STABLE): cf. Mini HowTo (B)
Other way: re-install official ROM and remove the TouchPal application: cf. Mini HowTo (A).
Our feedback: following 3 days in this configuration, phone seems stable. We just encounter 2 unwanted reboots while installing apps. Following 20 days, we encounter some hang issue with google app, and then few days after the phone were not able to boot anymore.
Conclusion: change the phone!
Resources
- adb+fastboot ( eg. https://www.getdroidtips.com/how-to-install-adb-and-fastboot-on-windows/ )
- TWRP recovery for your phone (eg. https://www.getdroidtips.com/twrp-recovery-wiko-ridge-4g/#Download_Files )
- Unofficial ROM (+patch) from XDA-Developers:
| Nom | Experience in my case: keeping in mind that each phone have it's own hardware issue ;) |
|---|---|
| cyanogenmod-unofficial | Boot OK, Wifi OK, Camera OK but need to disable GPS Location to make it working. With GPS enabled, the phone hang when taping on application icon. Day2: the mobile is not able to find 2G/3G/4G ! :( |
| maxicm-5-1-1-unofficial | boot OK, wifi OK, but camera and GGMaps hangs the phone after fiew seconds!! :( |
| lineageos-13 | (need to retest with gapps!) seems stable but there is some matter: no camera + batterie issue |
| resurrection-remix | not tested because of forum feedback: Mobile data doesn't work. Camera works but for a few seconds. Then device hangs. |
| SlimLP | not tested following ASAZING answer: "Mobile data and gps do not work" |
- Google Apps: http://opengapps.org/
- SuperSU (v2.82 ou sup.)
HowTo pre-requisites
check adb is detecting your device:
(from mobile)
- power + volume UP until vibration
- (else try volume DOWN on some device)
- "apply update from adb"
(from workstation)
c:\adb\adb.exe devices
- your device must be listed
HowTo: boot on TWRP recovery
(from workstation)
c:\adb\fastboot.exe boot TWRP_L5320.img
(command is now waiting the phone...)
(from mobile)
- power + volume UP until vibration
- "reboot to bootloader" (line 5)

Mini HowTo (A) re-install Official ROM from scratch onto WIko Ridge Fab 4G 5320 (with Snapdragon) and remove TouchPal
If you follow this steps, it's at your own risks. We can't be responsible if you brick your phone
- download official ROM from support-fr.wikomobile.com
- download SuperSU (v2.82 ou sup.)
- unzip
RIDGE_FAB_4G_LL_V14.zipand executeRIDGE FAB 4G_V14.exe, then follow the step described on the screen. - boot on TWRP

- push SuperSu on the phone:
c:\adb\adb.exe push SuperSU-v2.82-201705271822.zip /tmp
- install SuperSU using TWRP

- reboot the phone
- via Android parameters ("Langue et saisie"), move from Touchpal keyboard to Google keyboard.
- install Désinstalleur App System(ROOT) (SuperSu required)
- with this application, uninstall "TouchPal 2015" (and associated langage packs)!!
Mini HowTo (B) install Custom Unofficial ROM onto WIko Ridge Fab 4G 5320 (with Snapdragon)
If you follow this steps, it's at your own risks. We can't be responsible if you brick your phone
From following samples: (getdroidtips.com) lineage-os-13-wiko-ridge-fab-4g and (phonandroid.com) Root Ridge4G
What "patch" means ? (5320 only)
- download ROM + patch
- push ROM (ex. for L5510) on the phone using adb
- push patch (ex. from 5320) on the phone using adb
- onto TWRP :
- install ROM (dont reboot)
- (got back)
- install patch (dont reboot)
- (got back)
- install GAPPS
- reboot
- boot on TWRP recovery (already described)
- lets do a Backup ! (use menu option and follow instructions, check system and data partitions)
- push your ROM (and patch) file(s) on the phone (adapt zip path+filename)
(from workstation for MaxiCM ROM)
c:\adb\adb.exe push MaxiCM-5.1-20170209-UNOFFICIAL-l5510.zip /sdcard
c:\adb\adb.exe push kernel_ASAZING-L5320.zip /sdcard
c:\adb\adb.exe push open_gapps-arm-5.1-super-20171224.zip /sdcard

(from workstation for Cyanogem ROM)
c:\adb\adb.exe push cm-12.1-20170211-UNOFFICIAL-l5510.zip /sdcard
c:\adb\adb.exe push kernel_ASAZING-L5320.zip /sdcard
c:\adb\adb.exe push open_gapps-arm-5.1-super-20171224.zip /sdcard
- ( optionnal ) if you need more space, remove older ROM
(from workstation)
c:\adb\adb.exe shell
cd /sdcard
ls
rm OLD_ROM_SAMPLE.zip
exit
- HowTo flash ROM on the phone
(from phone / TWRP recovery)
- "wipe" data (fr: formatter)
  - "advanced Wipe"
  - check cache + System + data
  - swipe to wipe
- back back back
- "install" rom ("flash" with TWRP):
  - select pushed file: ROM
     - dont check zip signature and dont check reboot
     - swipe to confirm Flash
     - at the end, back
  - (option) select pushed file: PATCH (eg. kernel_ASAZING..)
  - dont check zip signature and dont check reboot
     - swipe to confirm Flash
  - select pushed file: GAPPS
  - dont check zip signature and dont check reboot
     - swipe to confirm Flash
- at the end, Wipe cache/dalvik, swipe to Wipe
- then "Reboot System"
EMUI 5.0 Android 7 fiche pratique
EMUI 5.0 Android 7 fiche pratique
Retrouver une application:
- sur l'accueil, glisser le doigt vers le bas et saisir le début du nom de l'application.

- dans la liste des résultats taper sur l'application pour la lancer ou bien sur l'icône position de droite pour localiser son raccourci.

Applications masquées
- pour voir les applications masquées il faut faire un zoom sur l'écran d'accueil (séparer 2 doigts collés à l'écran).

- pour ajouter ou retirer (démasquer) une application masquée, il faut taper sur le [+] après la dernière application masquée:

Retrouver une application:
- sur l'accueil, glisser le doigt vers le bas et saisir le début du nom de l'application.

- dans la liste des résultats taper sur l'application pour la lancer ou bien sur l'icône position de droite pour localiser son raccourci.

Applications masquées
- pour voir les applications masquées il faut faire un zoom sur l'écran d'accueil (séparer 2 doigts collés à l'écran).

- pour ajouter ou retirer (démasquer) une application masquée, il faut taper sur le [+] après la dernière application masquée:

Cochez les applications pour les masquer ou les décocher pour démasquer et les retrouver sur l'accueil.
HowTo: Swig C to Java: functions that manage an array of int, simple or complex struct (eg. array of objects)
You would like to map a C code from your Java application and you have heard about Swig: this post is for you!
This post is a really simple example to understand how to manage (from Java application) a C array of complex structure.
After reading Swig 3 documentation and searching on the net, I've finally succeed to create a little poc on how to return a list of struct.
proof of concept sample includes 4 functions:
source of this poc is available here : https://github.com/boly38/pocswig
this poc is widely inspirated from similar example from "Samuel Jacob's Weblog" post (thanks to him !)
First file to write is the C header
The you will then have to write the C implementation. Here is a sample
And now to access this function from java, you will have to use Swig.
Swig use a specification file to setup how to map function/types/etc... This file is a
Line 1 define the module name,
Line 3&4 define how to handle int array using swig facility,
Line 6 to 8 to tell to Swig to output include line into the target wrapper file.
Line 10 reuse as is the header file as specification (Swig MUST wrap all header file methods and structs to Java).
Line 11 to 15 to tell to Swig to append an extra function to help Java user to access to array element.
Now you will have to generate Java files! Use Swig :
Now you can play with your new library from Java; exemple
I let you execute that:
If you see something wrong, please tell me. Else hopes this helps!
This post is a really simple example to understand how to manage (from Java application) a C array of complex structure.
After reading Swig 3 documentation and searching on the net, I've finally succeed to create a little poc on how to return a list of struct.
proof of concept sample includes 4 functions:
- a function
sumitemsthat accept an array of integer as parameter to calculate a sum (part of Swig3 documentation) - a function
populateSampleItemthat just write on a given simple structure - a function
populateItemsthat update an existing array of struct - a function
buildItemsthat create from scratch a result array of struct
source of this poc is available here : https://github.com/boly38/pocswig
this poc is widely inspirated from similar example from "Samuel Jacob's Weblog" post (thanks to him !)
First file to write is the C header
poc.h:
1 2 3 4 5 6 7 8 9 10 11 12 13 14 15 16 17 18 19 20 21 22 23 | /* (in) simple int array as parameter */ int sumitems(int *first, int nitems); /* simple structure */ typedef struct MyItem_t { int id; char *name; } MyItem; /* (in/out) simple struct as parameter (updated by the function) */ void populateSampleItem(MyItem *item); /* array of structure */ typedef struct MyItems_t { int count; // elements count MyItem *elements; // array of MyItem } MyItems; /* (in/out) array of structure as parameter (updated by the function) */ void populateItems(MyItems *items); /* (out) array of structure (generated by the function) */ MyItems *buildItems(); |
poc.c:
1 2 3 4 5 6 7 8 9 10 11 12 13 14 15 16 17 18 19 20 21 22 23 24 25 26 27 28 29 30 31 32 33 34 35 36 37 38 39 40 41 42 43 | #include <stdlib.h> #include <stdio.h> #include <string.h> #include "poc.h" int sumitems(int *first, int nitems) { int i, sum = 0; for (i = 0; i < nitems; i++) { sum += first[i]; } return sum; } void populateSampleItem(MyItem *item) { item->id = 1234; item->name = strdup("getSampleItem"); } void populateItems(MyItems *items) { int nb = items->count; items->elements = malloc(nb * sizeof(MyItem)); for (int j=nb-1;j>=0;j--) { items->elements[j].id = j; char elementName[80]; sprintf(elementName, "populateItems %d", j); items->elements[j].name = strdup(elementName); } } MyItems *buildItems() { printf("buildItems 14 elements"); int nb = 14; MyItems *items= malloc(sizeof(MyItems));; items->count = nb; items->elements = malloc(nb * sizeof(MyItem)); for (int j=nb-1;j>=0;j--) { items->elements[j].id = j; char elementName[80]; sprintf(elementName, "buildItems %d", j); items->elements[j].name = strdup(elementName); } return items; } |
And now to access this function from java, you will have to use Swig.
Swig use a specification file to setup how to map function/types/etc... This file is a
.i file. Here is the file poc.i:
1 2 3 4 5 6 7 8 9 10 11 12 13 14 15 | %module swigpoc %include "arrays_java.i"; %apply int[] {int *}; %{ #include "poc.h" %} %include "poc.h"; %extend MyItems_t{ MyItem * getElement(int i) { return &$self->elements[i]; } } |
Line 3&4 define how to handle int array using swig facility,
Line 6 to 8 to tell to Swig to output include line into the target wrapper file.
Line 10 reuse as is the header file as specification (Swig MUST wrap all header file methods and structs to Java).
Line 11 to 15 to tell to Swig to append an extra function to help Java user to access to array element.
Now you will have to generate Java files! Use Swig :
rm -f *Item.java *.o *.dll swigpoc*
swig -java poc.i
You could look at your directory, there is some new C and Java files:
poc_wrap.c, MyItem.java, MyItems.java, swigpoc.java swigpocJNI.java
Next step is to build up the DLL (shared library) (exemple under Cygwin):
1 2 3 4 5 6 | #!/bin/bash JAVA_HOME=/cygdrive/c//Programmes/Java/jdk1.8.0_112/ INCLUDES="-I$JAVA_HOME/include/ -I$JAVA_HOME/include/win32/" x86_64-w64-mingw32-gcc.exe -c poc.c poc_wrap.c $INCLUDES x86_64-w64-mingw32-gcc.exe $INCLUDES -shared -o poc.dll poc_wrap.o poc.o |
PocExample.java:
1 2 3 4 5 6 7 8 9 10 11 12 13 14 15 16 17 18 19 20 21 22 23 24 25 26 27 28 29 30 31 32 33 34 35 36 37 38 39 40 41 42 | public class PocExample { static { System.out.println("load poc ..."); System.loadLibrary("poc"); System.out.println("load poc ... OK "); } public static void main(String args[]) { System.out.println("poc"); System.out.println("sumitems:"); int[] arrayB = new int[10000000]; // Array of 10-million integers for (int i=0; i<arrayB.length; i++) { // Set some values arrayB[i] = i; } int sum = swigpoc.sumitems(arrayB, 10000); System.out.println("SumB = " + sum); System.out.println("MyItem:"); MyItem myt = new MyItem(); swigpoc.populateSampleItem(myt); System.out.println("myt.name = " + myt.getName()); MyItems myts = new MyItems(); myts.setCount(10); swigpoc.populateItems(myts); for (int j=0; j<myts.getCount(); j++) { System.out.println(String.format("myts.element[%d].name = '%s'",j, myts.getElement(j).getName())); System.out.println(String.format("myts.element[%d].id = '%s'" ,j, myts.getElement(j).getId())); } MyItems rez = swigpoc.buildItems(); for (int k=0; k<rez.getCount(); k++) { System.out.println(String.format("rez.element[%d].name = '%s'",k, rez.getElement(k).getName())); System.out.println(String.format("rez.element[%d].id = '%s'" ,k, rez.getElement(k).getId())); } } } |
I let you execute that:
1 2 3 | #!/bin/bash JAVA_HOME=/cygdrive/c//Programmes/Java/jdk1.8.0_112/ $JAVA_HOME/bin/javac *.java && $JAVA_HOME/bin/java PocExample |
If you see something wrong, please tell me. Else hopes this helps!
Yet another MUSE Best-Of
Let me introduce you to the best-of MUSE songs :p
Muse - 2006 - Starlight [Official Music Video]
Muse - 2009 - Uprising [Official Video]
Muse - 2010 - Hysteria [Official Music Video]
Muse - 2010 - New Born
Muse - 2010 - Plug In Baby
Muse - 2010 - Sunburn
Muse - 2010 - Time Is Running Out (video)
Muse - 2012 - Resistance
Muse - 2013 - Supremacy (Official Video)
Muse - 2015 - Dead Inside [Official Music Video]
Muse - 2015 - Reapers [Official Lyric Video]
Muse - 2015 - The Handler [Official Lyric Video]
Concerts
Muse Live - 2000 - Presqu'île de Malsaucy - Eurockéennes (Belfort)
Muse Live - 2015 - Main Square Festival
NB: year is youtube video publication date. With helps of thetoptens
How to Jenkins : chain jobs with parameters
This post describes How To chain jobs with parameter(s).
- Choose optionA if you're using pipeline plugin.
- OptionB is a little bit deprecated, but usefull if you would like to script your build execution or trigger it remotely.
NB: this option will make loosing your pipeline chain.
I recommend to use 2 small dedicated temp jobs to test it first. That would avoid to run unnecessarely long build...
Steps :
 Add a shell script to echo the variable.
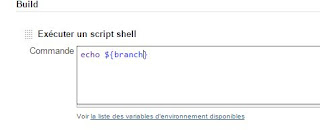

 Go to the Job console to check curl http status.
 Go to the follower (second) job logs.
 Check the follower result!

- Choose optionA if you're using pipeline plugin.
- OptionB is a little bit deprecated, but usefull if you would like to script your build execution or trigger it remotely.
(option A) Define a post action in first job
First recommended and simple way if your are using "Build Pipeline". Go to the first job configuration to append a post-action :
(option B) Chain it using shell scripts
NB: this option will make loosing your pipeline chain.
I recommend to use 2 small dedicated temp jobs to test it first. That would avoid to run unnecessarely long build...
Steps :
- Install Build Token Root Plugin
- Define first job with parameter
- Define second job ("follower") with parameter
- Define a trigger for the follower
- Append a shell script to chain the two jobs
- Try!
Install Build Token Root Plugin
Ask to your Jenkins administrator to install this plugin : Build Token Root Plugin
Wait that Jenkins reboot (required).
Define first job with parameter
Add "branch" parameter to your first job.


Define follower job with parameter
Add "branch" parameter to your second job (same as previously).
Add a shell script to echo the variable(same as previously).
Define a trigger for the follower
Add a trigger for the second job. Set a secret token here.

Append a shell script to chain the two jobs
Open the first job configuration to add the following shell script.
You will need to adapt the jenkins host value corresponding to your environment.
# show job parameter
echo branch=${branch}

#  resources
#  https://wiki.jenkins-ci.org/display/JENKINS/Parameterized+Build
#  https://wiki.jenkins-ci.org/display/JENKINS/Build+Token+Root+Plugin
#  http://curiositedevie.blogspot.nl/2016/02/how-to-jenkins-chain-jobs-with.html
export JENKINS_HOST=https://myjenkins.domain.net
export JOB_TOKEN=THISISWONDERFULL
export JOB_NAME=git_config_follower
export JOB_PARAM1=branch=${branch}
export JOB_CAUSE=Launching_follower_with_branch_set_to_${branch}
export JOB_PING="$JENKINS_HOST/buildByToken/buildWithParameters?job=$JOB_NAME&token=$JOB_TOKEN&$JOB_PARAM1&cause=$JOB_CAUSE"
echo $JOB_PING
curl --verbose --insecure $JOB_PING
Try!
Launch the first job with a parameter.


Log4j 1.x with maven: minimal howto
This post is a minimal howto for log4j version 1.
What a simple task ! but who never search a simple sample on the web send a little stone to me ;)
Feel free to copy paste anyway ;))
What are the dependencies
You will need to add log4j, slf4j and lombok (to use @Slf4j) :
 <properties>
  <!--General project configuration -->
  <project.build.sourceEncoding>UTF-8</project.build.sourceEncoding>
  <project.reporting.outputEncoding>UTF-8</project.reporting.outputEncoding>

  <lombok.version>1.16.6</lombok.version>
  <log4j.version>1.2.17</log4j.version>
  <slf4j.version>1.7.10</slf4j.version>
  <junit.version>4.12</junit.version>
 </properties>
 <dependencyManagement>
  <dependencies>
   <!-- @Slf4j annotation -->
   <dependency>
    <groupId>org.projectlombok</groupId>
    <artifactId>lombok</artifactId>
    <version>${lombok.version}</version>
    <scope>provided</scope>
   </dependency>
   <!-- ## LOGS ## -->
   <dependency>
    <groupId>log4j</groupId>
    <artifactId>log4j</artifactId>
    <version>${log4j.version}</version>
   </dependency>
   <dependency>
    <groupId>org.slf4j</groupId>
    <artifactId>slf4j-api</artifactId>
    <version>${slf4j.version}</version>
   </dependency>
   <dependency>
    <groupId>org.slf4j</groupId>
    <artifactId>slf4j-log4j12</artifactId>
    <version>${slf4j.version}</version>
   </dependency>
How to use it
Simply add "@Slf4j" to your class, and then you could use "log" as logger.
import java.security.InvalidParameterException;

import lombok.extern.slf4j.Slf4j;

@Slf4j
public class MyClass {
    public MyClass() {
        log.debug("constructor YEP");
    }

    public void doIt(long value) {
        log.info("doIt {}", value);
        try {
            throw new InvalidParameterException("Zobby");
        } catch (Exception ee) {
            log.error("I'm so stupid: {} => {}", ee.getClass().getSimpleName(), ee.getMessage(), ee);
            log.warn("same without stack trace !: {} => {}", ee.getClass().getSimpleName(), ee.getMessage());
        }
    }
}
How to configure appenders
To configure log4j, add a
log4j.properties file to your resources. Start by defining a console appender. This appender should appear in the rootLogger definition too. You could define the following content to start:log4j.rootLogger=DEBUG, console ## Console appender log4j.appender.console=org.apache.log4j.ConsoleAppender log4j.appender.console.threshold=DEBUG log4j.appender.console.layout=org.apache.log4j.PatternLayout log4j.appender.console.layout.ConversionPattern=%d %5p [%c{1}] %m%n # package log levels # # Log4j bootstrap # log4j.logger.org.apache.http = INFO log4j.logger.com.myapp = DEBUG #
How to configure file appender
Update your rootLoger to refer to the logfile appender, and add a logfile appender definition:
log4j.rootLogger=DEBUG, console, logfile

## File appender
log4j.appender.logfile=org.apache.log4j.RollingFileAppender
log4j.appender.logfile.threshold=DEBUG
log4j.appender.logfile.layout=org.apache.log4j.PatternLayout
log4j.appender.logfile.layout.ConversionPattern=%d{ISO8601} - %-5.5p - %t - %c - %m%n
log4j.appender.logfile.file=MY_CUSTOMFILEHERE.log
log4j.appender.logfile.maxBackupIndex=5
log4j.appender.logfile.maxFileSize=2048KB
log4j.appender.logfile.append=true
How to configure graylog (splunk-like) appender
Update your rootLoger to refer to the graylog appender, and add a gelf appender definition:
### Graylog appender
log4j.appender.graylog2=org.graylog2.log.GelfAppender
log4j.appender.graylog2.graylogHost=tcp:mygraylogserver.net
log4j.appender.graylog2.graylogPort = 12201
#log4j.appender.graylog2.originHost=(default to the local hostname)
log4j.appender.graylog2.facility=gelf-java
log4j.appender.graylog2.layout=org.apache.log4j.PatternLayout
log4j.appender.graylog2.extractStacktrace=true
log4j.appender.graylog2.addExtendedInformation=true
log4j.appender.graylog2.additionalFields={'environment': '${projectEnvironment}', 'application': 'MyPoc','version': '${buildVersion}_${buildTimestamp}'}
How to configure NT event appender
Pre-requisites : add
NTEventLogAppender.dll and NTEventLogAppender.amd64.dll to the current directory or to the java ld library path. You could append "-Djava.library.path=PATH" to your application if needed. Get this dll files from log4j zip distribution doc : https://wiki.apache.org/logging-log4j/NTEventLogAppender
Update your rootLoger to refer to the ntappender appender, and add a new ntappender definition:
# NTEventLogAppender
log4j.appender.ntappender=org.apache.log4j.nt.NTEventLogAppender
log4j.appender.ntappender.Source=MyKillerApp
log4j.appender.ntappender.layout=org.apache.log4j.PatternLayout
log4j.appender.ntappender.layout.ConversionPattern=%d{ISO8601} - %-5.5p - %t - %c - %m%n
For this last usecase you will be able to see the app logs into Windows Event Log service :

Swagger UI + Auth0 Bearer
When you would like to integrate Swagger UI with a token based authentication (like Auth0), this is the way you need to update Swagger index.html :
      function addApiKeyAuthorization(){
        var key = encodeURIComponent($('#input_apiKey')[0].value);
        if(key && key.trim() != "") {
            var apiKeyAuth = new SwaggerClient.ApiKeyAuthorization("Authorization", "Bearer " + key, "header");
            window.swaggerUi.api.clientAuthorizations.add("key", apiKeyAuth);
            log("added key " + key);
        }
      }
Instead of adding api_key as part of the query, this code is adding your token in an "Authorization" header and with "Bearer " as prefix.
enjoyGMail: gestion de vos emails aux petits oignons
Lorsque vous vous abonnez à une liste de diffusion / mailing-liste (exemple: archive des ML Apache ) ou alors lorsque vous recevez des mails automatisés (exemple: résultats de build Jenkins);
ce que vous aimez c'est :

ce que vous aimez c'est :
- recevoir les mails en temps réel ou selon vos préférences sur vos différents supports clients mails,
- (ML) pouvoir y répondre de suite.
ce que vous détestez c'est :
- avoir à classer/archiver ces emails,
- avoir à supprimer les anciens mails inutiles (redondants avec les archives des ML ou avec votre dashboard Jenkins).
L'idéal serait de souscrire aux ML sans en avoir les inconvénients. Peut être des services en lignes ou d'autres méthodes existent (ex. souscription à un RSS) ; certains même me diront mais pourquoi classer ses mails :), .. mais personnellement j'ai décidé d'opter pour l'automatisation de la gestion de ce type de mails
Première étape : appliquer un label aux emails reçus : je ne vais pas faire l'affront de décrire cette étape car je pense que l'aide GMail est auto suffisante.
Seconde étape : utiliser un script google script pour automatiser la gestion de ces mails. Pour cette étape, rendez vous sur cette page de code. Vous y trouverez le code à copier-coller sur votre google script. Le reste n'est que paramétrage. Ce script utilise notamment les filtres avancés pour déterminer les fils de discussion (thread;groupe de mails) utiles.
Le code est assez lisible en l'état.
Dernière étape : planifier l'exécution du script selon vos besoins. L'aide en ligne de google script est très bien structurée.

Personnellement avec un filtre de réception, je positionne mes mails automatisés sous un label fils du label "ML".
Puis avec ce code google script, je peux archiver automatiquement les mails de ML vieux de 2 jours et supprimer automatiquement les mails archivés de ML vieux de 60 jours minimum et n'ayant pas de label "keep".
Et vous comment faites vous ? des remarques positives/négatives sur ce type de gestion ..?
Inscription à :
Articles (Atom)
Analyser les performances
Ouvre le gestionnaire des tâches:CTRL+MAJ+ECHAPDisque dur
Ajuster afin d’obtenir les meilleures performancesApplications imposées
Lister
Get-AppxPackage | Format-List -Property NameDésinstallation
Réinstaller une application
Si par erreur vous avez supprimé une application utile, reprenez son nom dans la ligne suivante (ex. pour la première^):Sources utilisées